Monday, August 18, 2014

Button That Lip!

The Altered Pages Design Team has joined the Craft Hoarders Anonymous Challenge Blog Design Team for Challenge #14 
Button It in a UP Blog Hop!

Hello and welcome!  Today I am honored to be part of a fun blog hop with my Altered Pages Design Team as well as Craft Hoarders Anonymous.  The theme of this hop is BUTTONS!  Most of us crafters and artists have at least a few buttons in our stash...a few hundred in some cases.  So, take a look at what I have made for you and be sure to check out what at all the bloggers have created as well (listed at end of this post).  Leave a comment letting us all know you were here. We all love to hear from you...and your name might just be drawn to win an amazing stash of goodies from Altered Pages, including Japanese Oil Pastels and oodles of ephemera! 
For this project I gathered up my buttons and put my thinking cap on.  After deciding on the general idea I knew I needed a large surface because I wanted to make a big old set of lips out of buttons along with the saying "Button that lip!"  So, the large Dylusions journal would be perfect.  I love playing in my journal anyway. lol! 
In the two pictures above you can see how I started my background using the Dylusions inks letting all that drippy goodness do its thing. The next picture shows how I created the lips out of buttons.  I started with a rough sketch for the shape and then I filled it in with buttons in pale pink, fuchsia and reds, all typical lip stick colors.  I then filled it all the empty space with black and added a white outline.  

To give the background more interest I added texture by using a stencil and gel medium.  I love the result of how it gives background colors an extra pop.  I also added some stamped images and gave the entire page a border.  I added a few more buttons along the border. 

Next, I chose a vintage text page and ran it through the printer with the saying "Button that lip!" in a sassy font.  I then added a coating of clear embossing powder.  This was a very thin piece of text page and I didn't want it getting damaged.  I love the effect. 
Finally, I added a bow that I customized using white seam binding that I dyed with my Grape Crush Dylusions ink.  I also included a little scraps of pink lace and a few more buttons along the border. 
Some detail with my white Uniball pen and it was finished. 

I hope you enjoyed my nod to buttons.  
Thanks for stopping by. 
Stephanie 

Projects used:
Assorted buttons
Dylusions inks - in Funky Fuchsia, Grape Crush, Vibrant Turquoise and White

Here are links to take you right to the other Altered Pages Design Team blogs.  You are sure to see many great works.  


Make sure to stop by the Craft Hoarders Anonymous Design Team pages. To find the links to their posts visit Craft Hoarders blog http://gloriadesignschallenge.blogspot.com/

Amber Milone 
Christy Butters 
Debbie Seyer 
Donna Idlet 
Ginny Nemchak 
Glenda Brooks 
Gloria Stengel 
Jan Marie Ennenga 
Karen Zueger 
Kathy Clement 
Pam Bray
Tammi Bennett


Friday, August 15, 2014

Goodnight Dear One...

Happy Friday!!! 

Today I have my second installment for the collaboration between Altered Pages and Sin City Stamps


So, you may or may not know that Altered Pages and Sin City Stamps design teams have been collaborating for the month of August.  The first couple weeks of the month we concentrated on all things "fairy" and some amazing projects were created.  For the second and my most favorite portion of the partnership we are waking the spirits and Halloween is our theme.  


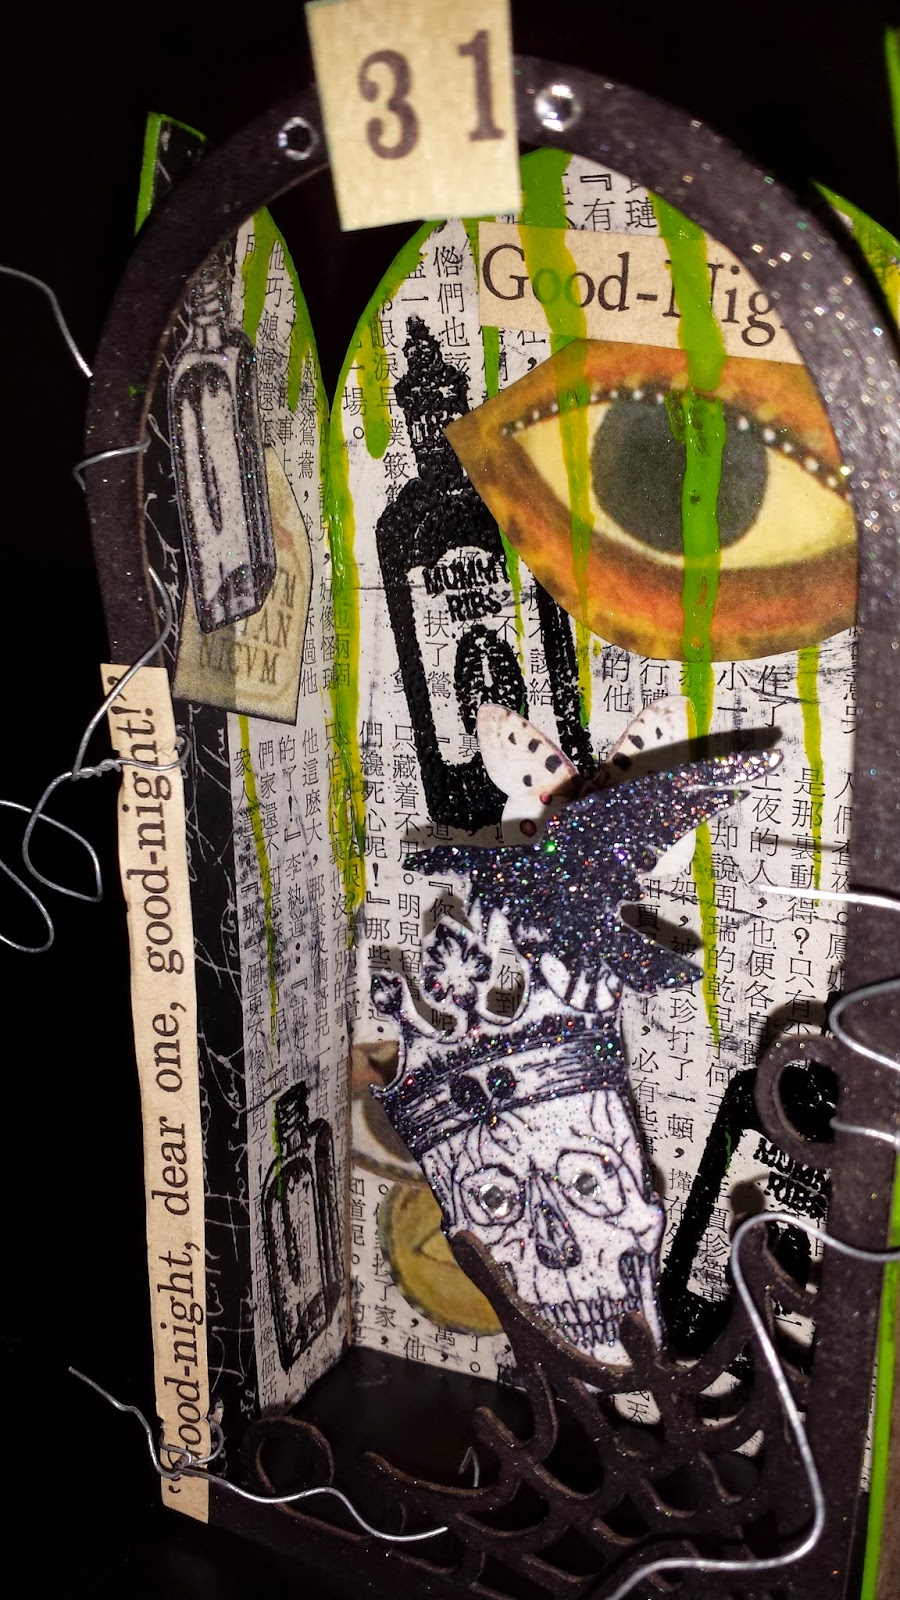
I have for you today a Halloween Shrine titled Good-night Dear One.

   
For this project I used the Chipboard Shrine Frame and Halloween rubber stamps from Sin City Stamps as well as collages images and other goodies from Altered Pages.

I started by inking up the blank chip board shrine.  I quickly realized that this was leaving an amazing pattern on my craft sheet so I grabbed a tag to lay behind while I finished inking and I now have the perfect background and beginning for a Halloween tag. 

           
I then added Vintage text pages to the base or background of the chipboard.  I distressed that a bit with black ink...after all this had to look a bit tattered and beat up. 
After adding some awesome spooky Halloween images from Sin City Stamps and collage images from Altered Pages I allowed gooey, slimy, green ink to drip down from the top of the shrine. Some of the fussy cut stamped images were done in StazOn Jet Black in and then coated entirely with VersaMark and embossed with a clear iridescent embossing powder.  The others were stamped in clear VersaMark and embossed in black. 
I then went to work on detailing the "iron gate" of my shrine.  I gave the entire gate a coat of gel medium with a bit of shimmer to emulate a metal effect.  I also added stamped images and a phrase that I was lucky to find on the very vintage text page I was using. This is where I got the idea for my title.  I threw in a little bling here and there for good measure. 
I then wired my gate to the shrine with small gauge craft wire.  I purposefully left the ends and edges a bit rough, you know craftsmanship wasn't always the cream of the crop when the craftsmen were actually the undead...ooohhh aahhh haaaaa haaaa haaaa (insert Vincent Price voice here). 
I really hope you enjoyed my Halloween Shrine and I know for most of us it's still pretty hot out there, but maybe this will get you in the Halloween crafting spirit. 

Make sure you leave a comment letting us know you were here. We love to hear from you and know what you think. 

Thank you and have a safe and happy weekend!
Stephanie S. 


Friday, July 4, 2014

Vintage Flight

Hi friends!  As you may already know for the month of July Altered Pages is teaming up with The Leaky Shed Studio.  We are very excited for this collaboration.  It is sure to be the result of many fun and inspiring projects.

The theme of this month is "flies" and no we don't mean those nasty little fellows that bug us during summer picnics.  We mean anything, and we do mean anything, that flies.

For my project I chose to use Leaky Sheds "Hot Air Balloon 2".  I companied this with some great Altered Pages products and well, my project took FLIGHT!


I am going to TRY and let the photo's do the talking in this post with just a minimal amount of detail for the instruction.  I was a little camera happy while creating this, so there should ample photo examples.  I am not kidding when I say camera happy...you will see.  :-)


I began colorizing my Hot Air Balloon using my Nautical Blue Memento Luxe ink pad and a sponge dauber.


While the ink dried on the hot air balloon, I went to the collage sheet that I was going to basically create a giant tag with.  I used the Steampunk and Gears collage sheet and just enlarged the portion I wanted, cut that out and punched a whole in the top to create a tag.


Next, I colorized the image by taking my Toffee Crunch ink pad directly to the paper.


I then added a bit of texture by using a scrap piece of punchinella and my Clear Creative Medium.


While the Creative Medium was drying I went back to my balloon and embossed it a few times over, layering it with multiple different embossing powders.  I used a glittery gold, then a timber brown and finally a vibrant turquoise on the body of the balloon.  For the cable and basket portion I used only metallic gold.  A little advice be careful not to overheat your chipboard piece as with most embossing projects.


I then went back to my tag and added layers of color alternating with Toffee Crunch, Nautical Blue and Delicata Golden Glitz.  You can really see here the texture and depth that the medium gives you.  I love that you can still see the gear image under it all.


I then took the large tag and mounted it on a larger still piece of navy blue card stock.  I wanted it to really pop and I think the dark background does the trick.  I added gold gilded stickers to the four corners for a little extra shiny goodness.
 

Going back to the balloon now...I added a scrap of the navy blue paper behind the balloon portion and added a charm that is a fun flying monkey.  Maybe he's evil, we don't really know him well enough yet to know these kind of things.  Either way he just fit, plus I always love adding something dimensional and mobile to most of my mixed media pieces.


I also added a scrap of lace that I colorized with the Delicata Golden Glitz, a few pearl Dew Drops and pretty fibers tied to complete the tag.  I actually think this would be lovely made into a card or added to the front a gift bag.


I hope you enjoyed my vintage, flight, fun, flying monkey piece. 
 
Supplies used;
Mementos Inks - Nautical Blue and Toffee Crunch
Delicata Ink - Golden Glitz
Clear Creative Medium


Friday, June 20, 2014

Boho Chic Upcycle Lantern


Hi again everyone.  This month I am excited to be a part of the collaboration between the Altered Pages Design Team and Imagine Crafts/Tsukineko Design Team.  Imagine Crafts was so kind to share some of their amazing inks, tools and sprays with us.  We get to play with the fun and innovative products and you get to learn a new technique or two.


Today, I have for you a boho chic diy candle lantern made with products from both Imagine Crafts/Tsukineko and Altered Pages.
 

For this project I used my StazOn Midi ink pads to add color and dimension to various sizes of sheet metal. I also used charms, chain and hand dyed seam binding to create the look I was after.

A very important step in colorizing metal with StazOn is to always use GlazOn after each layer of StazOn ink. StazOn...GlazOn (like wax on...wax off...as John from Imagine Crafts would say.) They go together!


Apply your desired color of StazOn ink to the sheet metal remembering to cover the surface with GlazOn after and let each layer dry before moving on to the next.


If you so choose you can easily add your favorite collage images sprayed with Goosebumps to give that embossed and textural look.

Just hole punch and add a jump ring or three to create a unique charm or dangle out of your desired image or images. Goosebumps makes it so fast and easy.  I ended up not using these this time around, but they turned out so cool and they on the workspace front and center just waiting for the perfect project


Once I had my sheet metal inked and dried I began wiring up the actual lantern. I started with a glass globe...the kind you can find at your local hardware store. I actually have a few on hand after replacing various light fixtures over the years. I knew these little gems could have a much more posh life than just hanging out with a dated fixture on the back porch. I used a nice chunky silver chain and wired it snug to the globe.  

Next, I created the hanger that my lantern would suspend from using the same chunky chain.
 

I then created my charms that would dangle and catch the light from the candle inside.
This was for sure the most fun part of this project...wiring all kinds of goodies together creating color and movement. In the next few pictures below
you can see all the fun. You can find all the charmy goodness here.


Then, it was time to attach the charms. One by one I just kept adding.

This is where I added the hand dyed seam binding as well.
To create the hand dyed ribbon I spritzed the ribbon first with water and then with Dylusions Ink in Polished Jade.  I love this combination.  The seam binding takes the ink so nicely and the color options are endless.

In the picture below you can see my new Boho Lantern perched so prettily with all of the embellishments and additions glowing in the candle light.


Ooooohhh pretty...


Supplies used for this project can be found here; 

StazOn Midi in Blue Hawaii, Emerald City, Citrus Green and Midnight Blue
GlazOn
Goosebumps
Ink blushers
Sheet metal in various sizes


Thursday, June 5, 2014

80's Baby!


Hi there and welcome!

Stephanie here and man is this a very exciting month at Altered Pages.  You may have already heard, but this is worth repeating.  We are very honored to partner with IMAGINE Crafts for the entire month of June!   Make sure to check back all month long to see what these two talented groups create for you.

When I was going through my stash of goodies from IMAGINE Crafts there was a set of inks screaming at me to be the focal point.  I knew I had to use the Radiant Neon Ink Pads.  I loved the colors and they immediately took me back to the 80's...hence my title "80's Baby!"   You can see in the picture below I used the Electric Pink and Purple inks with small daubers to get a bright background to kick off this piece.

 
My project is a continuation of my creepy baby book, that you may have seen in a couple previous posts here  and  here , using the Arched Door Book from Altered Pages.  These fun little books are very popular and are back in stock after recently selling out!
 

While working on this the neon colors inspired me to load up my playlist of music with all my 80's favorites, Depeche Mode, Tears for Fears, Stray Cats, and some Bronski Beat.  The ideas came rolling in and it even reminded me of a few concerts back in the day so I knew where to head with this and I knew I had to give these 80's rock star babies tickets to a show of their own.


I had fun creating neon tights, full length lace gloves and Madonna inspired jewelry in this project.  I hope you enjoyed this fun node the 80's, an amazingly fun time in my life, recreated with amazingly cool supplies and tools from IMAGINE Crafts  and  Altered Pages.

Supplies used from IMAGINE Crafts;
Radiant Neon Ink Pads in - Electric Purple, Electric Pink, Electric Green and Electric Yellow.
Staz On Midi in - Jet Black and Cloudy Sky
Ink Blushers
Small Daubers
Pssst! Sheer Shimmer Spritz - Sparkle

Supplies used from Altered Pages;
Arched Door Board book
My Head is Spinning collage sheet
Altered Paper Dolls collage sheet
Misc. embellishments

Thanks for stopping by!
Stephanie