Friday, November 18, 2016

Watercolour Fall Foliage Tag

Happy Friday, gang!  We made it!  Another week tackled, yay us!!

Now, for some crafting fun.   Today, I have for you a "mostly" quick fall foliage tag that would make a great addition to a hostess gift or greeting card.  And, we all know there is an endless need for those quick little gifties this time of year. 


I am keeping with my trend for this month and that is water colour. In my post a couple weeks ago I decided to get back to what I truly love and that is painting with watercolours making a pointsettia tag. And, here that is below.  
I am keeping with that trend today.  And, you will see that both of my posts involve tags.  I think most of us love tags because the size makes them manageable. Even if you want to get really intricate a tag is still a type of project that can be completed in an hour, an evening, etc. 

Let's get going.......
I began with a page from my Dylusions Journal. Did you know you can just create on that wonderful paper and rip that page right out of your journal to use however you want?   Yes, you can.   And, for some of you wondering, no, this is not 300 pound cold pressed watercolour paper.  However, for this application it is just fine. 
 So, I began with a quick sketch. 
Don't be too heavy handed as you will 
need to erase most of your pencil marks 
so they don't show through your final image. 
Then, begin applying your watercolour.  

Give your image some dimension by adding darks and lights. 


Next, I choose the tag/s.  These were tags where the background was previously created with the forethought that they would someday be used for something great.  The green tag was done with multiple shades of mists and inks after "wrinkling" the tag. 


The amber tag was created with multiple shades of golds and amber ink pads applied directly onto the tag.  You can see that there is also a stamped image of the Eiffel Tower...sorry today we only need the background.  Paris, you will have to wait. 

I then adhered the green tag to the gold tag using 3/8 inch double side tape.  I added a few pieces of beautiful ribbon fibers and seam binding that I dyed with coordinating inks.  Next, came attaching the fall leaf to the tag.   I did this by applying Zig 2 Way Glue Pen to the back of the leaf.  This makes those small intricate cuts adhere perfectly.   

Attach this beautiful tag to a wine bottle, tea towel or gift basket and you will certainly convey how Thankful you are for your Holiday Hostess. 

I hope you enjoyed this little tag!  I 100% enjoyed playing with my true love, watercolour, in a quick way that tackles multiple uses. Gotta love painting therapy for me 
and a hostess gift for someone special.  
Thanks so much for joining me.  
Stephanie Siatta 
for the
Altered Pages Design Team

Here is a quick supply list....

Friday, November 4, 2016

Getting Back To My True Love - Watercolor

Well, Hi there! 

Welcome to the Altered Pages Blog.  I am happy you stopped by.   This month the Design Team will be focusing mostly on the Holidays coming up.  Today, I decided to combine that goal with a medium that I truly love...watercolor.  I love all types and styles of art, but when it comes to making my heart happy I love to paint and watercolor is my medium of choice for painting.  It is definite therapy for my soul. 


So, I whipped up a quick Poinsettia tag that I can incorporate into a card, gift bag or mixed media project.  Here it is...I hope you like it. A supply list will be at the end of the post. 

I started with an oversized tag and used a mossy green and truffel Salazar ink to colorize the background.  Then, I sketched my basic outline of a poinsettia.  
Next, I started layering my watercolors...and layering and layering. 
   
Once I was happy with all of the lights and shadows I added some pretty ribbons and it is ready for its next phase.  I am not sure what that will be, but it will be perfect for adding to a hostess gift or card.  I can stamp on it or just sign and date it.  We will have to see...
I really love the watercolor kits that Altered Pages has.  I always keep a sketch and paint kit ready to go when traveling or if I know I am going to have some time on my hands.  I can grab a little journal or a tag, get out my watercolor pencils, a couple water brushes and I am ready to create.  I also love the AP logo canvas tote. It is large enough to hold all of my goodies and sturdy to stand the test of time. 

Thanks again for stopping by.  Please leave me a comment so I know you were here.  Be sure to check back all month long and see what we have up our sleeve next.  
~Stephanie 


Supply List - 
Alteredpages.com
Mixed Media Salazar Iinkx - Mossy
Mixed Media Salazar Inkx - Truffle
Watercolor paints, inks, etc.
Watercolor Pencil Tin
Watercolor Pencil Mini Set
Aqua Flo Water Brushes
Waterbrushes
Pipettes
Tag
Ribbons and Trims
AP Logo Canvas Tote

Friday, October 21, 2016

Altered Tin With Surprise Giftie Inside

Hi guys!  I have a fun little altered tin for you today.  I think this just makes the cutest gift and I already have a friend in mind to give this to.  She LOVES Halloween about as much as I do, so I know this will be a hit.


I began using a tin from Altered Pages that you can find here.   I added vintage text paper, a fun pumpkin collage and some ribbon and twin to cover the tin.  I really love the Gothic Lace Stickers that you can see here at the top and bottom of the tin.  They are a wonderful textural element and so easy to use.

Next, I added vintage black cat images to bottle caps using Crystal Lacquer.  You can find all sorts of wonderful Halloween images here.  The Crystal Lacquer was used under the image to adhere it to the bottle cap and again on top to create a resin type look over the top of the image.  Crystal Lacquer is self leveling so that makes it great for this application and it doesn't take over night to dry...Bonus!

    
And, I added a little charm bobble at the bottom for some extra fun and glimmer.
These skull charms would be awesome too!

I added a bit more Crystal Lacquer to the pumpkins eyes to give them a little extra umph.  I didn't really want to use the word pop seeing as these are eyeballs that we are talking about. Ew!  ;-)


I then added a little gothic label to the back so I could sign and date my creation.  When able, always sign and date your art or craft project...you never know what journey your works will take and whose hands they will end up in some day.

Here are a few more shots... Can I Just say...look at that beautiful background paper.  That is from the lovely line of Sabor Papers that you can find here.


Please join us all month long as we show you how to alter boxes, tins, bins, etc. 
Thanks for stopping by!   Stephanie Siatta for Altered Pages

Here is a list of supplies used for this project.
Halloween Collage Images
Metal Tin
Bottle Caps
Bottle Cap Clear Dome Stickers
Misc. Ribbons and Trims
Crystal Lacquer
Vintage Text Pages

Friday, October 7, 2016

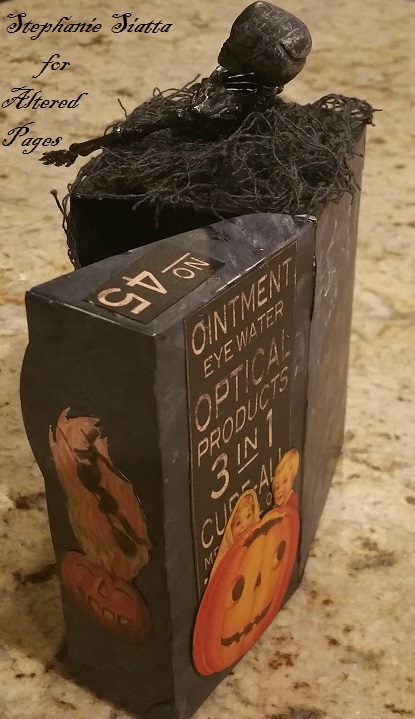
Tea Bag Box or Vintage Crypt...you decide

I am so excited for October to finally be here.  That means cooler temps in the desert and Halloween décor!  Halloween is my absolute favorite time of year to decorate for.  I guess I love all things creepy. 


This month the Alteredpages.com Design Team is altering boxes.  Boxes of all kinds and shapes.  I think this is gonna be fun!

I began my project with a cute little box that tea bags come in.  We have all seen these and I don't know about you, but I HATE recycling them.  I am always trying to come up with something cute to do with them, well, I decided to turn the cute little lemon ginger tea box into a vintage creepy crypt! 

This is how things started...

And, then with the addition of black and cream craft paint the cardboard box became a stone grave.


(I hope you saw Trisha's project yesterday, but she also altered a box.  Her variation involved a baseball card box transformed into a tea bag chest and boy was I impressed.  We must have been channeling our inner tea time recently.  You can see her post HERE.) 


Next, I began adding a bit of gothic cheese cloth, scraps of floral paper and adorable vintage collage Halloween images.  Specifically, I used images from Halloween Horribles and Happy Halloween collage sheets.   I also added bits from the Optical Odditites Old Curiosity Shoppe 12 x 12 paper from Graphic 45. 


You can see in the pic above how I toned down the floral images.  I used the same black and cream craft paint...just watered down quite a bit.  I brushed it on and smeared it with my finger tip to get an aged, not so vibrant look.
I also added a bit of vintage text page on the back of the crypt.  If you follow this blog, you already know that I incorporate vintage text or music sheet into so many of my projects.  It is versatile, adds interest and it is easy to work with.

Next, I added a fun little plastic skeleton (from the dollar store) to the top of the crypt.  He looks like he is emerging from his tomb.  He was added with a dab of hot glue where everything else was adhered with the ever versatile Aleene's Tacky Glue. 


Check back for the remainder of the month to see all the amazing box transformations we come up with. 


Thanks for stopping by!
Steph S.

Friday, September 16, 2016

Transcontinental ATC

Continuing with the month of ATC's...

This time a vintage airline tag, a few elements of Chinese inspired collage and pretty pearls makes for a fun travel abroad  ATC.


I began with a vintage airline tag that is a wee bit bigger than actual ATC size, but remove that perforated section and poof ATC!  I am okay with the extra inch or so...  Then I chose an Asian travel related collage...find your favorite here.


Let the fussy cutting begin!
I then added some fun metallic mist and let dry.
Then, just begin placement with Aleene's Tacky Glue and dimensional adhesives. 


Thanks for stopping by...
Stephanie Siatta

Now, the details on how YOU can participate as well...
Join us during September for ATC Awesomeness!  
Prizes include papers, stamps, art pencils and more!  Prizes will be given weekly by random drawing to one lucky person.  You simply send a photo of your ATC creation*, we will add it to the blog.  You can submit any day of the week.  Each Sunday a prize will be displayed on the Blog.  The following Sunday a prize will be awarded.  You can submit up to three photos each week.  It's not mandatory, but we would really like for you to incorporate AlteredPages products with your ATCs.
 *Send your ATC photos one of two ways


Email to:   Artsociates@gmail.com
Post on Facebook:   https://www.facebook.com/AlteredPagesArtsociates/
Very important to ADD hashtag  
#SeptemberATC  so we know you want to be entered in the prize drawing.

 Thanks for joining us and we hope you play along! 

Monday, August 18, 2014

Button That Lip!

The Altered Pages Design Team has joined the Craft Hoarders Anonymous Challenge Blog Design Team for Challenge #14 
Button It in a UP Blog Hop!

Hello and welcome!  Today I am honored to be part of a fun blog hop with my Altered Pages Design Team as well as Craft Hoarders Anonymous.  The theme of this hop is BUTTONS!  Most of us crafters and artists have at least a few buttons in our stash...a few hundred in some cases.  So, take a look at what I have made for you and be sure to check out what at all the bloggers have created as well (listed at end of this post).  Leave a comment letting us all know you were here. We all love to hear from you...and your name might just be drawn to win an amazing stash of goodies from Altered Pages, including Japanese Oil Pastels and oodles of ephemera! 
For this project I gathered up my buttons and put my thinking cap on.  After deciding on the general idea I knew I needed a large surface because I wanted to make a big old set of lips out of buttons along with the saying "Button that lip!"  So, the large Dylusions journal would be perfect.  I love playing in my journal anyway. lol! 
In the two pictures above you can see how I started my background using the Dylusions inks letting all that drippy goodness do its thing. The next picture shows how I created the lips out of buttons.  I started with a rough sketch for the shape and then I filled it in with buttons in pale pink, fuchsia and reds, all typical lip stick colors.  I then filled it all the empty space with black and added a white outline.  

To give the background more interest I added texture by using a stencil and gel medium.  I love the result of how it gives background colors an extra pop.  I also added some stamped images and gave the entire page a border.  I added a few more buttons along the border. 

Next, I chose a vintage text page and ran it through the printer with the saying "Button that lip!" in a sassy font.  I then added a coating of clear embossing powder.  This was a very thin piece of text page and I didn't want it getting damaged.  I love the effect. 
Finally, I added a bow that I customized using white seam binding that I dyed with my Grape Crush Dylusions ink.  I also included a little scraps of pink lace and a few more buttons along the border. 
Some detail with my white Uniball pen and it was finished. 

I hope you enjoyed my nod to buttons.  
Thanks for stopping by. 
Stephanie 

Projects used:
Assorted buttons
Dylusions inks - in Funky Fuchsia, Grape Crush, Vibrant Turquoise and White

Here are links to take you right to the other Altered Pages Design Team blogs.  You are sure to see many great works.  


Make sure to stop by the Craft Hoarders Anonymous Design Team pages. To find the links to their posts visit Craft Hoarders blog http://gloriadesignschallenge.blogspot.com/

Amber Milone 
Christy Butters 
Debbie Seyer 
Donna Idlet 
Ginny Nemchak 
Glenda Brooks 
Gloria Stengel 
Jan Marie Ennenga 
Karen Zueger 
Kathy Clement 
Pam Bray
Tammi Bennett